
CUSTOMER FEEDBACK: This page is dedicated to our customers who have graciously supplied feedback about C.A.P. mods. We appreciate all of our customers, and we really like getting photos and feedback.
Here's a note from customer Paul Ollman from Belvidere, IL. He bases at Poplar Grove Airport (C77) - June 2016


Here's a note from customer Paul Ollman from Belvidere, IL. He bases at Poplar Grove Airport (C77) - June 2016


Thanks to C.A.P. My prewar BC-12-65 has become a BC12-85.
The assistance from Terry was essential to this project happening.
Information received from C.A.P. was very well organized and easy to follow.
The performance change and starter have made an already amazing aircraft design even better.
Thanks again Paul Ollmann
We received this kind letter from Ron Dupre of Rush City, MN in January 2016.


**********************************************************
L-2A w/ DER approved 9-gal Wing Tanks, Mark Watson
Mark Watson's L-2A was a 2011 Sun-N-Fun tornado victim. However Mark was determined NOT to let this adversity overcome his pride and joy. He set about to get his bird back in the air ASAP. After the tornado, Mark set out on a mission to make repairs and while at it, he decided to install CAP's extended range fuel tanks. Mark's work is outstanding. So much so that his feedback resulted in some nice improvements to the CAP drawing package.
 |
| Mark's L-2A at Sun-N-Fun, 2011 - Photo via. AVweb |
**********************************************************
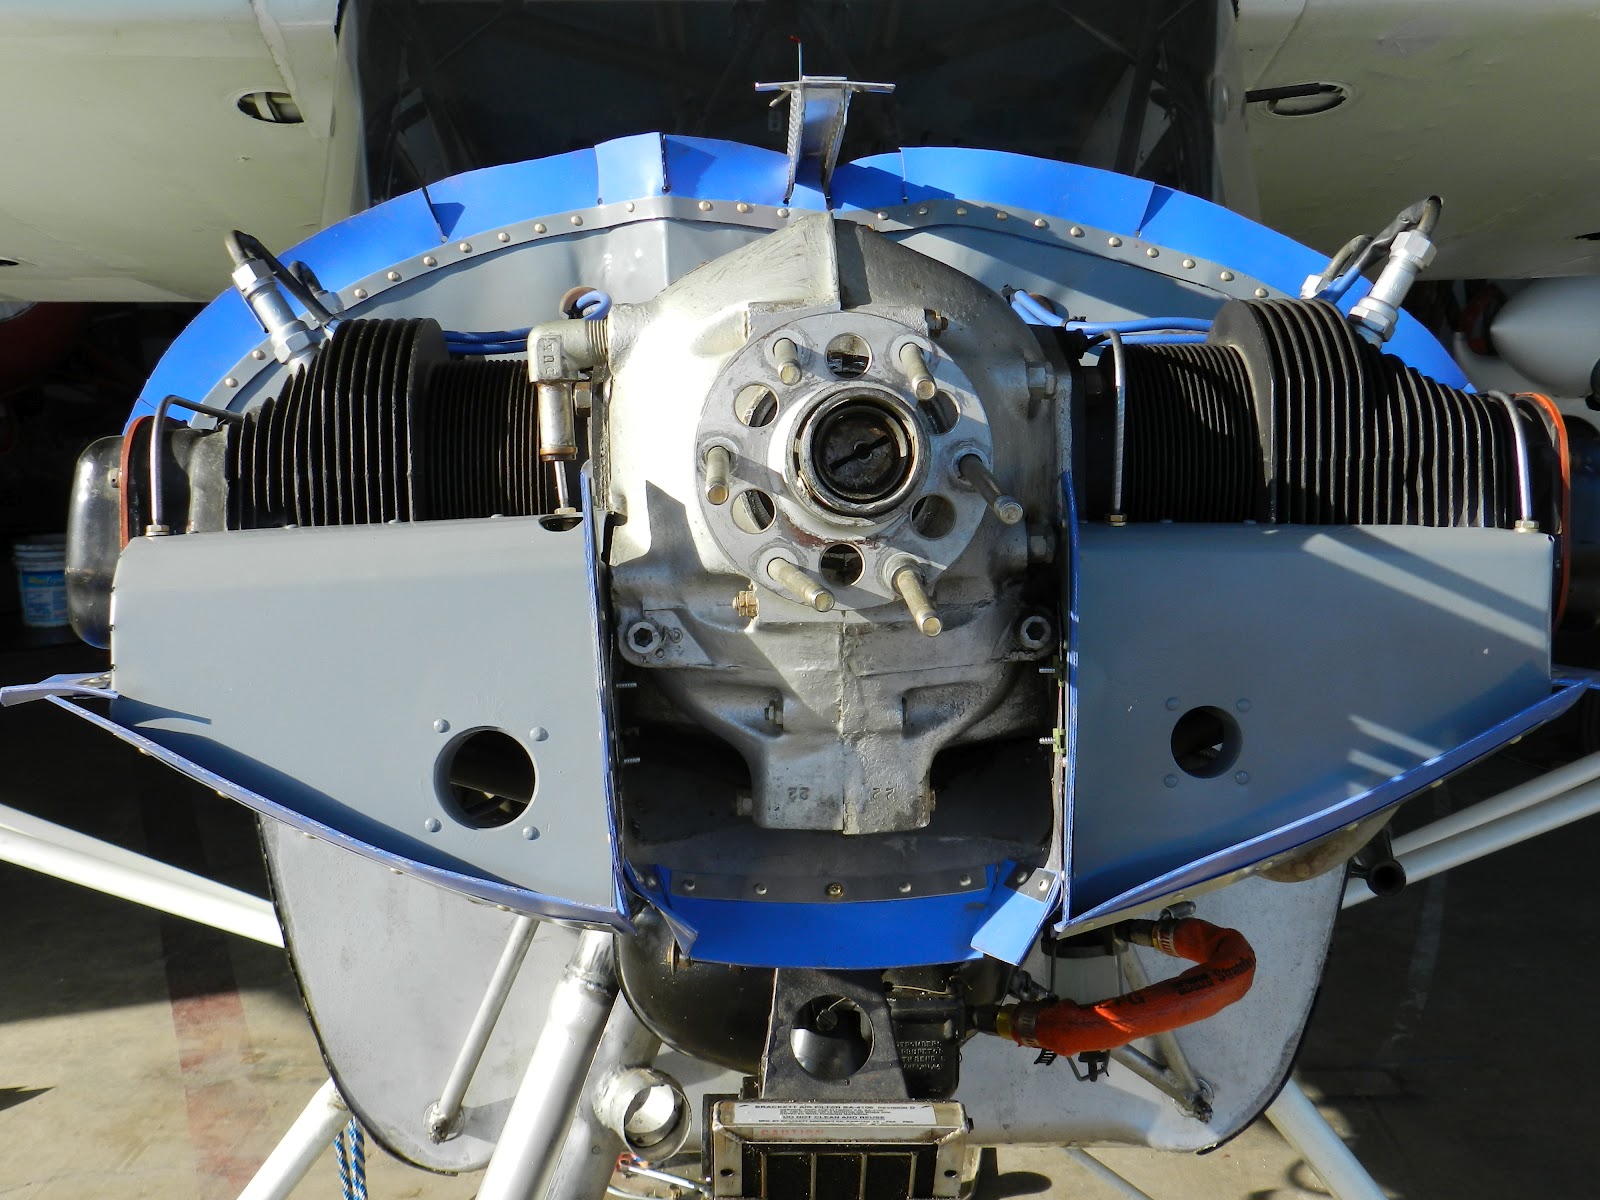
BC12D w/ DER approved Baffle Drawings, George Wacker
George recently installed an A65-8 firewall-forward from an Aeronca Champ. Baffles were converted to Taylorcraft style using the CAP baffle drawing package. This is a worthwhile "DO IT YOURSELF" project to upgrade your airplane's tired old baffles. George's workmanship is really nice. George is from Los Angeles, CA.
Terry,... My Taylorcraft BC12-D S/N 6581 is back in the
air with your help via
signed engine baffle drawings. To recap, this airplane had an Aeronca
Champ cowl and baffle installation so it need to be restored to it's
former
dignity as a Taylorcraft. - Over 2.5 hours of flight time, the 65 HP
Continental A65-8 engine has
performed quite well, as expected. I need to wait for hot weather to
get
the oil temperature over 160F in a prolonged climb but don't expect any
issues.
Thanks for your help!... George Wacker - Los Angeles


**********************************************************
BC12D w/ Luscombe Exhaust & C85 STC, Craig Bixby
Craig recently installed the DER approved Luscombe exhaust on his Taylorcraft. He sent us these photos of his plane and the exhaust installation. Craig is from Indianapolis, IN.
Good Afternoon Terry...
Well, the exhaust project is done and for the most part the installation
went as forcasted. But, we did have a problem getting the shroud for
the cabin heat aligned so we could run the Scat Hose.... check the picture you had forwarded of an installation
someone else had done. As you can see they installed the shroud
horizontally on the pipe, which worked well for their installation of
the tubing....
When we went to install the shroud on my installation we discovered we
could not install the shroud horizontally on the exhaust pipe due to the
locator tabs on the pipe were vertical.
So, he either had to use the exhaust without the tabs you mentioned or he "removed" them. (He's talking about metal tabs welded on the exhaust pipe for attachment of the heat shroud.) Installing the shroud vertically aligned with the tabs placed the inlet and exhaust connections facing toward the engine with no clearance to connect the scat tubing at the angle of the manufactured shroud. So the angle of the scat tubing connections had to be changed to work for my installation. Luckily my IA has an excellent fabricator friend so it was somewhat a minor inconvenience. (see attached photo.JPG)
I also included some pictures of the final installation of the left side. The last picture is the the righthand exhaust and heat shroud for the crab heat that went together great with no issues. Feel free to use them if they will help any of your other customers decide they want to use your DER. Thanks and hope you and your family have a Merry Christmas..... Craig

 |
| RH side installed |
 |
| Tabs on Univair Stack |
 |
| LH side looking down |
I also had a chance to ask Craig some questions (black text). His answers are in blue text below...
1. How did the cowling holes come out? and.... 3. Did the RH side align with the original hole or did you have to move the hole? The new hole for the left exhaust was a little bit of a challenge to
measure to ensure it would align with the stack properly. But, by
enlarging it a little at a time it is pretty much just right. Since the old exhaust was larger in diameter due to the heat muff the
hole for the right exhaust is larger than it needed to be. Also, the
angle of the original exhaust and the Luscombe exhaust are
slightly different so we had to elongate the existing hole on the right
side slightly for clearance. Ideally a new lower cowl would make for a better looking installation.
2. Do you have any overall opinions about the mod to share? I think the dual exhaust is a large improvement of the original by doing away with the crossover tube and that terrible heat shroud. Installing a new taylorcraft exhaust would have required pulling the engine. Cutting the old one off with a die grinder saved allot of work. The Luscombe Exhaust was pretty much an easy installation other than the heat shroud issue mentioned earlier
4. Have you flown yet since the change? I did fly 2.5 hours home from the IA's place
5. What do you think about the noise level? Much worse? Hardly noticeable difference? I didn't see much difference in the noise inside but I use ANR headset and haven't gotten any feedback from anyone outside during a take off
6. Do you feel any performance difference?... or see it on the tachometer perhaps as an increase? I didn't pay it allot of attention at the time. I was hoping to get more feedback if I had been able to fly today.
7. How's the carb heat rise (or RPM drop) compared to previously? RPM drop is about the same as with the old exhaust
8. Looks like you bought everything from Univair.... true? Any comments about their quality? Yes, everything was Univair parts. I think the exhaust themselves were excellent. Though the heat shrouds seem to be made of very soft aluminum and I am not sure how they will hold up under the heat and vibration.
**********************************************************
BC12D with C-85 engine upgrade, Scott Raczynski
Scott's has equipped his Taylorcraft nicely for travel. Recently he came through Waco enroute from his home in Rapid City, South Dakota to visit his mother in Houston TX. Here's Scott's feedback.
"Terry, ...I am sending some photos of the aircraft. The instrument panel really
works nice... Also installing light-weight alternator to power my radio and a couple of power points... I enjoyed talking with you on the phone.
(Scott told me that he bought a new blank instrument panel and installed his flight instruments off center to allow space for his I-PAD to mount in the center of his panel. He raves about his "glass panel Taylorcraft". He says, "I have used the IPad with the WingXPro app and the Garmin MyCast app. The WX works great and has nice features. I really like the headwind/tailwind component graph." And he also talks about the capability to upload real-time weather at each fuel-stop.)
On the way home from Houston, I
diverted to Lincoln, Nebraska that day to visit my girls. I always like showing the
aircraft to interested people. (Can you blame him.) The last
photo is how it looked when I bought it. Later!!!"
 |
| How's this for a Glass Panel Taylorcraft? |
 |
| We are very partial to this color scheme at C.A.P. :) |

 |
| Before the mods. |
L-2B with C-90 engine upgrade, Bob Picard
I mailed Bob Picard his STC data package on April 26th 2011 and he announced completion on July 6, 2011. 71 days is pretty quick. Here's some of the feedback I got from Bob.
Terry, ...a report on my upgrade... here in Alaska.
The installation was pretty straight forward with just a few exceptions. I also took off the boot cowl repaired a few dents, repainted it and installed new Boeing fasteners and, of course, that took longer than just a straight engine swap. My biggest hurdle was that I had to make a new muffler heat shroud. The shroud that I had was not the original as shown in the parts book but is was similar except that the heat inlet air came in from the top on the left as well as the right side like the original. See attachment for the parts book picture. The problem was that with the magnetos down lower on the C‐90 than on the A‐65 it left no room to attach the “scat” tubing (see attached picture(s)). I moved the air inlet aft and canted it slightly toward the firewall to have adequate clearance for the tubing and not have it rub against the magnetos. The other problems that I had are minor annoyances. The wiring from the ignition switch was too short to reach the right magneto so it had to be replaced. The heat shroud is in the way of the oil screen and the exhaust system needs to be loosened and dropped down just a little to be able to pull out the oil screen to inspect it. (see picture). Everything else went ok. I don’t know if the exhaust system is different in the L2‐M and perhaps these items are not a problem for those aircraft. I understand you may be able to supply data for a field approval or one time STC for larger fuel capacity. I would be interested in more information as to how that would work and could be accomplished.
Regards, Bob Picard; Anchor Point, Alaska 99556
1 of 4 8/8/2011 1:12 PM
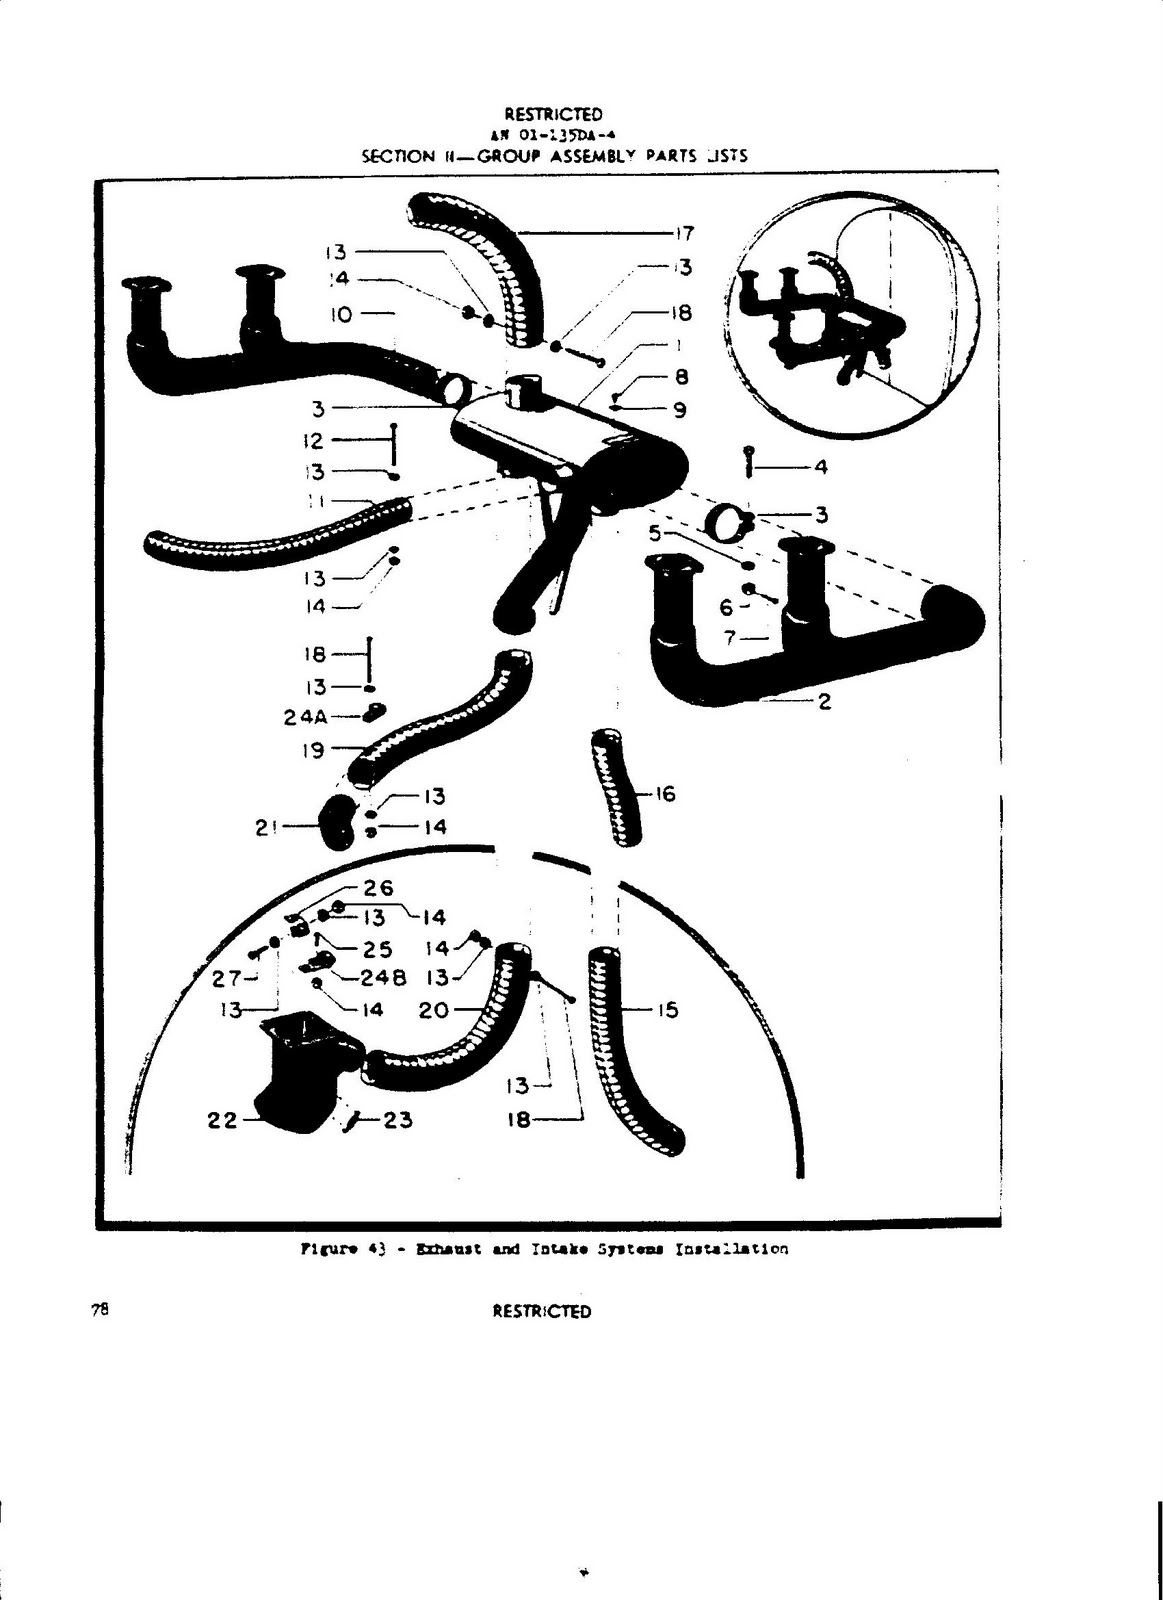
FACTORY EXHAUST INSTALLATION

EXISTING NON-STANDARD SHROUD
DUCT INTERFERENCE WITH MAG

 EXISTING NON-STANDARD SHROUD
DUCT INTERFERENCE WITH OIL SCREEN
MARKED FOR DUCT RE-LOCATION

No comments:
Post a Comment